Overview
Authentication defines the way a user is identified and validated through some sort of credentials as part of a sign-in flow. McMaster University uses SSO (Single sign-on) to provide authentication and authorization services for web applications. SSO relies on a centrally managed authentication mechanism that uses MacID to allow users in to various resources. During a login process, the authentication service provides a session based on a set of login credentials (a MacID and password). The generated login session remains persistent across multiple applications that participate in the SSO scheme. This session generally lasts for a limited amount of time until a new login session is required. Single sign-on is a federated identity management arrangement, and the use of such a system is sometimes called identity federation. In this type of federation, applications must be registered to enable trust with the organization providing authentication services.
Types of SSO Configurations Supported
SAML is an extensible markup language (XML) standard based on security assertions designed to facilitate the exchange of user authentication and authorization data across secure domains. A SAML based SSO service involves communications among the user, an identity provider that maintains a user directory and a service provider.
OAuth, which stands for Open Authorization and is pronounced “oh-auth,” is a protocol that acts as an intermediary on behalf of the user and works by obtaining an access token that authorizes specific account information or scope to be shared. When a user attempts to access an application, the service provider (SP) will send a request to the identity provider (IDP) for authentication. The service provider will then verify the authentication and log the user in.
Types of Applications Supported
Any web application located either on-premises or on the cloud can potentially make use of the authentication service, provided they support the technologies available and are authorized and legitimate for the purposes of the organization.
Azure SSO Integration Via SAML
Azure-AD As IDP
Microsoft Azure AD (Azure Active Directory) supports both SAML and Oauth2 for SSO authentication. When an application is registered with Azure AD, a trust relationship is established between the Azure-AD identity provider (IDP) and the application acting as a service provider (SP).
Enabling A SAML Based App Within Azure AD
To register a SAML based application with Azure AD, application owners must provide the Metadata URI (or an XML file containing the metadata details) and the Redirect URI of the application. The metadata should also contain the signing public key and the logout URI.
Azure in turn will expose the tenant-specific SSO and single sign-out URIs. These URIs represent addressable locations – they’re not just identifiers – so it is possible to go to the IDP URI to read the tenant’s metadata information. The azure metadata is generally located at https://login.microsoftonline.com/<TenantDomainName>/FederationMetadata/2007-06/FederationMetadata.xml
The <TenantDomainName> placeholder represents a registered domain name or TenantID of your Azure AD tenant. When the application gets registered, owners will be given the details of the registration and the specific tenant information for McMaster University.
The following table outlines the basic SAML elements required to enable Azure AD to recognize applications via SAML:
| Metadata Elements | Description |
| Identifier (EntityID) | Uniquely identifies the application. Azure AD sends the identifier to the application as the Audience parameter of the SAML token. The application is expected to validate it. This value also appears as the Entity ID in any SAML metadata provided by the application. App owners should provide a URL that uses the following pattern: ‘https://app-name.mcmaster.ca’ You can find this value as the Issuer element in the AuthnRequest (SAML request) sent by the application. |
| Reply URL | Specifies where the application expects to receive the SAML token response from the IDP. The reply URL is also referred to as the Assertion Consumer Service (ACS) URL. It is possible to specify more than one Reply URL. |
| Sign-on URL | When a user opens this URL, the service provider redirects to Azure AD to authenticate and sign in the user. |
| Relay State | Specifies to the application where to redirect the user after authentication is completed. Typically the value is a valid URL for the application. |
| Logout URL | Used to send the SAML/soap logout responses back to the application. |
User Attributes and Claims
When a user authenticates via a registered application, Azure AD issues the application a SAML token with information in the form of attributes/claims about the user that uniquely identifies them. By default, this information includes the user’s unique identifier (MacID), email address, first name, and last name. These claims might need to be customized if, for example, the application requires further specific claim values or a specific formatting of them.
The Unique User Identifier (MacID) value is a required claim and is the most important attribute in the set. The default name for this claim (based on EduPerson) is user.userprincipalname. This user identifier uniquely identifies each user within the organization. The specific name of this claim can be changed to fit an expected name-value and the content of it is generally ‘macid@mcmaster.ca’ for all McMaster University users. This value should not be confused with the email value. The email value might precisely resemble the unique identifier but in this case, it can also be different as the organization allows for email aliases. This is important as email is not to be considered a unique identifier.
McMaster University’s Azure identity platform supports single sign-on (SSO) with most enterprise applications and when a user authenticates through the identity platform using the SAML 2.0 protocol, it sends a token to the application. The SAML token contain pieces of information about the user known as claims (Attributes). A claim is information that an identity provider to identify and categorize users. In a SAML token, claims data is typically contained in the SAML Attribute Statement. The user’s unique ID is typically represented in the SAML Subject also referred to as the name identifier (nameID).
By default, the Microsoft identity platform issues a SAML token to an application that contains a NameIdentifier claim with a value of the user’s username (also known as the user principal name) in Azure AD, which can uniquely identify the user. The default SAML token also contains other claims that include the user’s email address, first name, and last name as shown below:
Default Claims:
- Claim name | Value
- Unique User Identifier (Name ID): user.userprincipalname [format:macid@mcmaster.ca]
- user.userprincipalname: user.userprincipalname
- user.emailaddress: emailaddress
- user.employeeid: employeeid
- user.givenname: firstname
- user.surname lastname
Optionally and upon request, the Microsoft identity platform can also issue extended claims containing the following type of information about identities:
Extended Claims:
- extensionAttribute1 = primary affiliation (possible values: student, employee, affiliate)
- extensionAttribute2 = union-code/student-status (employee’s union code or student’s status)
- extensionAttribute3 = department/faculty (emp. department or student’s faculty)
- extensionAttribute4 = sub-department (employee’s sub-department or student’s faculty)
- extensionAttribute5 = title (employee’s position name or student’s academic program)
The above-extended claims are populated by IAM based on extraction algorithms that calculate and determine what applies to each account depending on their specific status and updating of these values occurs immediately once changes have occurred on the person’s records. The passing of these extended claims on the response SAML token is optional and must be explicitly requested if an application wants to make use of these within their local processes.
SAML Signing Certificate
Azure AD uses a certificate to sign the SAML tokens it sends to the application. The application must be able to recognize this certificate to enable the trust between Azure AD and the application. The value of this certificate will be provided by UTS when configuring the application to be recognized by Azure AD.
Set Up The Application To Use Azure AD
Check out Understanding and Configuring SAML for details on how to configure your local SAML environment.
On the SAML application side, there are certain values that need to be configured on your SP deployment so it can use Azure AD as the SAML identity provider. You should set the values depending on the configuration steps of your specific SAML client software. For example, if you are configuring GitHub then you would go to the github.com site and set the values. Otherwise, you will need to use the documentation for the specific SAML client you are configuring.
The Login URL and Logout URL values should both resolve to the same SP endpoint, which is the SAML request-handling endpoint that is registered in the Azure AD tenant.
The Azure AD Identifier is the value of the issuer of the SAML token to the application, also known as the Azure AD IDP in the SAML scheme.
For an in-depth explanation of this process for SPs, refer to Understanding and Configuring SAML.
Testing The SSO Configuration
Once the application has been configured to use Azure AD, you can test the settings to see if SSO works as intended.
Use the EntityID URL provided and try to trigger an Azure session or use the login URL provided by UTS during the registration process. You might need to request a test account if you do not want to use ‘live’ accounts to test. Please refer to Test Login Accounts for more information.
If sign-on is successful, you can then request that users and groups become assigned to the SAML application for access control.
Azure SSO Integration Via OIDC/OAUTH2
Microsoft Azure uses an identity-as-a-service mode that relies on industry standard protocols to support authentication and authorization into various types of cloud-based services. These protocols are OIDC (OpenID Connect) and OAuth 2.0. While these protocols and services are standards-compliant, there can be subtle differences between various implementations of them. OpenID Connect (OIDC) is an authentication protocol that’s built on OAuth 2.0 and can be used to securely sign a user in to an application. OAuth2 is a protocol used for authorization in to protected resources. It is possible to have both protocols to work together to get authorization to access resources that the user owns and as such the terminology and flow are similar between the two. Authentication wise, OIDC is an alternative to the SAML protocol in that both deal with authentication. SAML authentication is commonly used with identity providers such as Active Directory Federation Services (ADFS) federated to Azure AD and is therefore frequently used in enterprise applications. OpenID Connect is commonly used for apps that are purely in the cloud, such as mobile apps, web sites, and web APIs. The Microsoft identity platform supports authentication for different kinds of modern application architectures. By using the authentication libraries for the Microsoft identity platform or any other libraries that are Azure SSO friendly, applications can authenticate identities and acquire tokens to access protected APIs.
In nearly all OAuth 2.0 and OpenID Connect flows, there are four parties involved in the exchange:
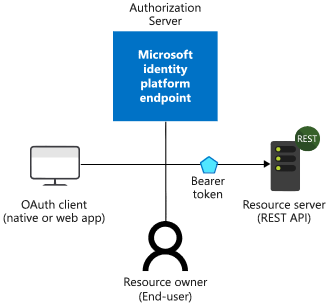
- The Authorization Server is the Microsoft identity platform and is responsible for ensuring the user’s identity, granting and revoking access to resources, and the issuing of tokens. The authorization server is also known as the identity provider – it securely handles anything to do with the user’s information, their access, and the trust relationships between parties in a flow.
- The Resource Owner is typically the end user. It’s the party that owns the data and has the power to allow clients to access that data or resource.
- The OAuth Client is your app, identified by its application ID. The OAuth client is usually the party that the end user interacts with, and it requests tokens from the authorization server. The client must be granted permission to access the resource by the resource owner. In SAML schemes this is is known as the SP side.
- The Resource Server is where the resource or data resides. It trusts the Authorization Server to securely authenticate and authorize the OAuth Client, and uses Bearer access tokens to ensure that access to a resource can be granted.
App Registration
For an identity provider to know that a user has access to a particular app, both the user and the application must be registered with the identity provider. When you register your application with Azure AD, you are providing an identity configuration for your application that allows it to integrate with the Microsoft identity platform. Registering the app also allows you to:
- Customize the branding of your application in the sign-in dialog. This is important because this is the first experience a user will have with your app.
- Decide if you want to let users sign in only if they belong to your organization (single tenant application) or allow users to sign in using any work or school account (multi-tenant application).
- Request scope permissions. For example, you can request the “user.read” scope, which grants permission to read the profile of the signed-in user.
- Define scopes that define access to your web API. Typically, when an app wants to access your API, it will need to request permissions to the scopes you define.
- Share a secret with Microsoft identity platform that proves the app’s identity. This is relevant in the case where the app is a confidential client application. A confidential client application is an application that can hold credentials securely. They require a trusted back-end server to store the credentials.
Once registered, the application will be given a unique identifier that the app shares with the identity platform when it requests tokens. If the app is a confidential client application, it will also share the secret or the public key depending on whether certificates or secrets were used in the app registration.
The app registration process requires a few values to register your app:
- An Application ID that uniquely identifies your app (generated by Azure)
- A Redirect URI (optional) that can be used to direct responses back to your app. This is similar to the ACS URI in SAML schemes.
- A few other scenario-specific values depending on the complexity of the required access.
Endpoints
Once registered, the app can communicate with the Microsoft identity platform by sending requests to the authorization server endpoint via these typical URLs:
https://login.microsoftonline.com/{tenant}/oauth2/v2.0/authorize
https://login.microsoftonline.com/{tenant}/oauth2/v2.0/token
Where the {tenant} can take one of four different values:
| Value | Description |
| common | Allows users with both personal Microsoft accounts and work/school accounts from Azure AD to sign into the application. |
| organizations | Allows only users with work/school accounts from Azure AD to sign into the application. |
| consumers | Allows only users with personal Microsoft accounts (MSA) to sign into the application. |
| 8eaef023-2b34-4da1-9baa-8bc8c9d6a490 or contoso.onmicrosoft.com | Allows only users with work/school accounts from a particular Azure AD tenant to sign into the application. Either the friendly domain name of the Azure AD tenant or the tenant’s GUID identifier can be used. |
Typically, during the app registration process the above value will be set to the ‘McMaster University users’ tenant value setting as there are no other organizations linked.
Protected Resources vs. Client Applications
Authentication scenarios via OIDC/OAuth2 involve two activities:
- Acquiring security tokens for a protected web API: We recommend that you use the Microsoft Authentication Library (MSAL), developed and supported by Microsoft but any other scripting scenario could work as well.
- Protecting a web API or a web app: One challenge of protecting these resources is validating the security token. On some platforms, Microsoft offers middleware libraries.
Tokens
OAuth 2.0 and OpenID Connect make extensive use of bearer tokens, generally represented as JWT (JSON Web Tokens). A bearer token is a lightweight security token that grants the “bearer” access to a protected resource. In this sense, the “bearer” is anyone that gets a copy of the token. Though a party must first authenticate with the Microsoft identity platform to receive the bearer token, if the required steps are not taken to secure the token in transmission and storage, it can be intercepted and used by an unintended party. While some security tokens have a built-in mechanism for preventing unauthorized parties from using them, bearer tokens do not have this mechanism and must be transported in a secure channel using transport layer security (HTTPS). If a bearer token is transmitted in the clear, a malicious party can use a man-in-the-middle attack to acquire the token and use it for unauthorized access to a protected resource. The same security principles apply when storing or caching bearer tokens for later use. Always ensure that your app transmits and stores bearer tokens in a secure manner.
There are 3 types of tokens used in OAuth 2.0 / OIDC:
- Access tokens – tokens that a resource server receives from a client, containing permissions the client has been granted.
- ID tokens – tokens that a client receives from the authorization server, used to sign in a user and get basic information about them.
- Refresh tokens – used by a client to get new access and ID tokens over time. These are opaque strings, and are only understandable by the authorization server.
An access token is a security token that is issued by an authorization server as part of an OAuth 2.0 flow. It contains information about the user and the app for which the token is intended and can be used to access web APIs and other protected resources. Access tokens are only valid for a short period of time, so authorization servers will sometimes issue a refresh token at the same time the access token is issued. The client application can then exchange this refresh token for a new access token when needed. ID tokens are sent to the client application as part of an OpenID Connect flow. They can be sent along side or instead of an access token, and are used by the client to authenticate the user.
Validating security tokens
It is up to the app for which the token was generated, the web app that signed-in the user, or the web API being called, to validate the token. The token is signed by the Security Token Server (STS) with a private key. The STS publishes the corresponding public key. To validate a token, the app verifies the signature by using the STS public key to validate that the signature was created using the private key. Tokens are only valid for a limited amount of time. Usually the STS provides a pair of tokens:
- An access token to access the application or protected resource, and
- A refresh token used to refresh the access token when the access token is close to expiring.
Access tokens are passed to a web API as the bearer token in the Authorization header. An app can provide a refresh token to the STS, and if the user access to the app wasn’t revoked, it will get back a new access token and a new refresh token.
JSON Web Tokens (JWTs) and Claims
The Microsoft identity platform implements security tokens as JSON Web Tokens (JWTs) that contain claims. Since JWTs are used as security tokens, this form of authentication is sometimes called JWT authentication.
A claim provides assertions about one entity, such as a client application or resource owner, to another entity, such as a resource server. A claim may also be referred to as a JWT claim or JSON Web Token claim. Claims are name/value pairs that relay facts about the token subject. For example, a claim may contain facts about the security principal that was authenticated by the authorization server. The claims present in a given token depend on many things, including the type of token, the type of credential used to authenticate the subject, the application configuration, and so on.
Applications can use claims for various tasks such as:
- Validating the token
- Identifying the token subject’s tenant
- Displaying user information
- Determining the subject’s authorization
A claim consists of key-value pairs that provide information such as the:
- Security Token Server that generated the token
- Date when the token was generated
- Subject (such as the user–except for daemons)
- Audience, which is the app for which the token was generated
- App (the client) that asked for the token. In the case of web apps, this may be the same as the audience
How Each Flow Emits Tokens and Codes
Depending on how your client application is built, it can use one (or several) of the authentication flows supported by Microsoft identity platform. These flows can produce a variety of tokens (ID tokens, refresh tokens, access tokens) as well as authorization codes, and require different tokens to make them work. This chart provides an overview of these:
| FLOW | REQUIRES | ID TOKEN | ACCESS TOKEN | REFRESH TOKEN | AUTHORIZATION CODE |
| Authorization Code Flow | X | X | X | X | |
| Implicit flow | X | X | |||
| Hybrid OIDC flow | X | X | |||
| Refresh token redemption | refresh token | X | X | X | |
| On-behalf-of flow | access token | X | X | X | |
| Client credentials | X (app-only) |
Tokens issued via the implicit mode have a length limitation due to being passed back to the browser via the URL (where response_mode is query or fragment). Some browsers have a limit on the size of the URL that can be put in the browser bar and fail when it is too long. Thus, these tokens do not have groups or wids claims.
Tokens and Sign-ins With Users or Without users
Most authentication scenarios acquire tokens on behalf of signed-in users but in some cases, it is possible to obtain tokens without any user sign-in. Security tokens can be acquired by multiple types of applications. These applications tend to be separated into the following three categories. Each is generally used with different libraries and objects.
- Single-page applications: Also known as SPAs, these are web apps in which tokens are acquired by a JavaScript or TypeScript app running in the browser. Many modern apps have a single-page application at the front end that is primarily written in JavaScript (other scripting technologies also can accomplish the same). The application often uses a framework like Angular, React, Node or Vue. js is the only Microsoft Authentication Library that supports single-page applications. This Category is the most common and most widely adopted for authentication/authorization scenarios.
- Public client applications: Apps in this category, like the following types, always sign in users:
- Desktop apps that call web APIs on behalf of signed-in users
- Mobile apps
- Apps running on devices that don’t have a browser, like those running on IoT
- Confidential client applications: Apps in this category include:
- Web apps that call a web API
- Web APIs that call a web API
- Daemon apps, even when implemented as a console service like a Linux daemon or a Windows service
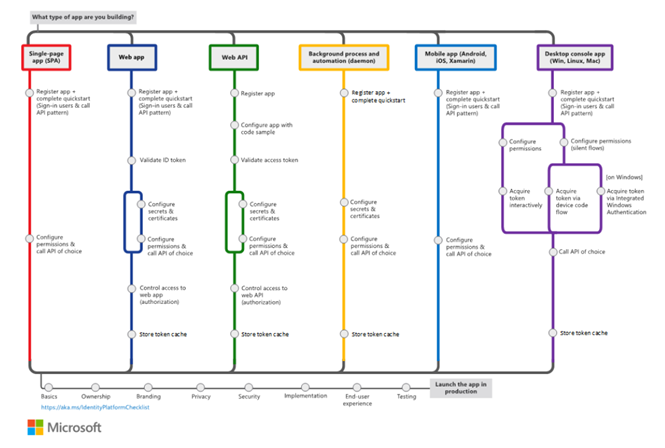
The following illustrates the common authentication/authorization scenarios supported by the Microsoft Identity Platform:
Sign-in audience
The available authentication flows differ depending on the sign-in audience. Some flows are available only for work or school accounts. Others are available both for work or school accounts and for personal Microsoft accounts. In the case of McMaster University this applies to work accounts for employees and school accounts for students and essentially all follow the same convention in terms of authenticating entities via an identity that uses this format: “uniqueID@organization.ca”
Authorization code flow vs. implicit flow
For most of the history of OAuth 2.0, the implicit flow was the recommended way to build single-page apps. But with the removal of third-party cookies and greater attention paid to security concerns around the implicit flow, the recommended method nowadays is to use authorization code flow for single-page apps. The Microsoft identity platform offers two grant types for applications:
Implicit flow (MSAL.js v.1.x)
Authorization code flow (with PKCE) (MSAL.js v.2.0)
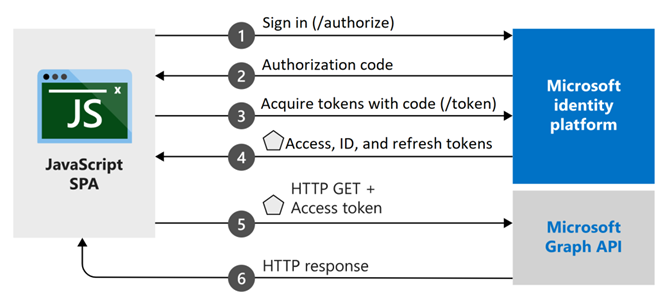
The following diagram illustrates the library architecture around these flows:
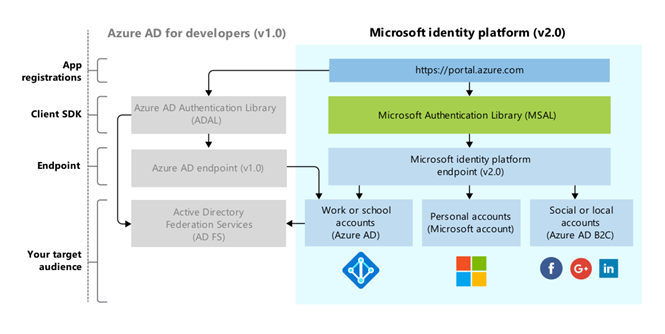
For further information on how to build and deploy apps via any of these methods read here.
Deploying and Configuring SAML
SAML is an acronym used to describe the Security Assertion Markup Language (SAML). Its primary role in online security is that it enables users to access multiple web applications using a set of login credentials. It works by passing authentication information in a particular format between two parties, usually an identity provider and a web application. SAML is also an open standard based upon the Extensible Markup Language (XML) format. Web applications use SAML to transfer authentication data between two parties – the identity provider (IDP) and the service provider (SP). SAML works by exchanging user information, such as logins, authentication state, identifiers, and other relevant attributes between the identity and service provider. SSO (Single Sign-On) is achieved when users can log on to multiple web applications after having logged only once into the identity provider thus providing a faster, seamless user experience.
The process can be best understood as a communication flow between a client browser and a web based application. The flow relies on browser redirects and HTTP GET and POST to request and pass around tokens. The process starts with the user triggering a login request to access a restricted resource that requires authentication. The login link is usually hosted by the SP server within the partner application. When a login request is received by the SP, a SAML request is sent via an HTTP request to the IDP server (Azure AD or Shibboleth).
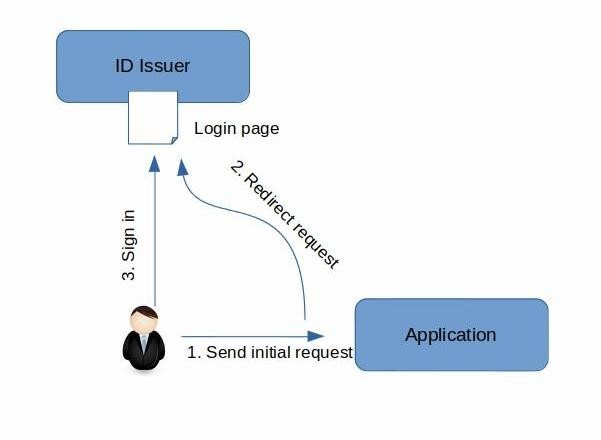
The IDP replies back with a login screen asking the user to authenticate. If the user passes the test and the IDP has authenticated the user, it gathers whatever claims the application needs, packages them into a security token, and signs the token with its private key. If the application wants its tokens encrypted, the IDP encrypts the token with the public key in the application’s certificate. The IDP then uses the Assertion Consumer Service URL registered by the SP to submit the token back to the browser and the SP. The ACS contains the return URL that the SP expects the traffic to be sent to if the login test has been passed. The SP then decodes the response message and if receives a ‘success’ result, it routes the user to the restricted area represented but the ACS URI.
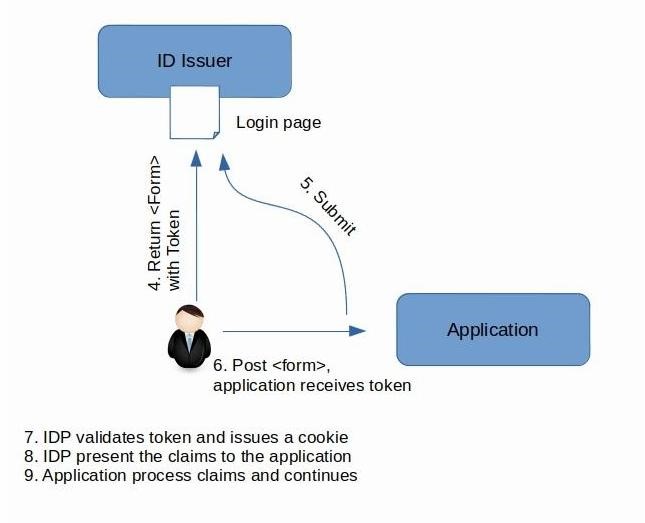
If the login fail tests, the IDP displays a message to the user indicating that there has been a problem and the user must verify the credential details before attempting again. Keep in mind that web applications and SOAP Web services each use slightly different techniques, but you should recognize that the overall shapes of the handshakes are very similar because the goal is always the same: to communicate claims from the IDP to the application in a secure fashion.
The communication flow can be better represented by a sequence of steps:
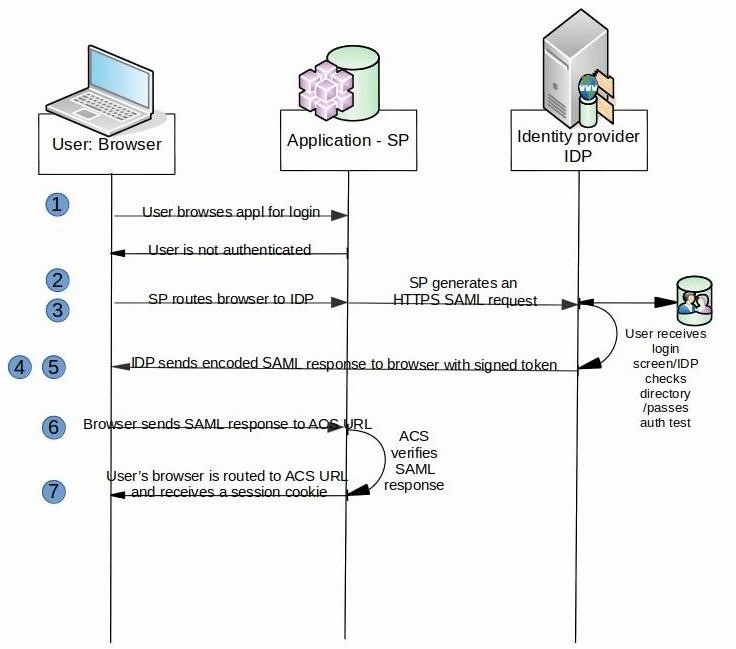
Keep in mind that the authentication process is not repeated unless the user signs off or destroys the session cookie or the session expires. When the user comes back and if a session cookie is present, the SP can intercept the session cookie and use it to reconstruct the session security token by decoding, decrypting and decompressing the cookie. Next, it checks the session security token expiration date, creates the ClaimsPrincipal object with the claims inside and sets the HttpContext.User property to the ClaimsPrincipal object. Security wise, all of the steps both for the initial and subsequent requests, should run over the Secure Sockets Layer (SSL) to ensure that an eavesdropper can’t steal either the token or the logon session cookie and replay them to the application in order to impersonate a legitimate user.
IDP Response
The IDP will always respond with an encoded XML message to indicate the result of the login interaction. The following illustrates a typical ‘successful’ login response from the IDP:
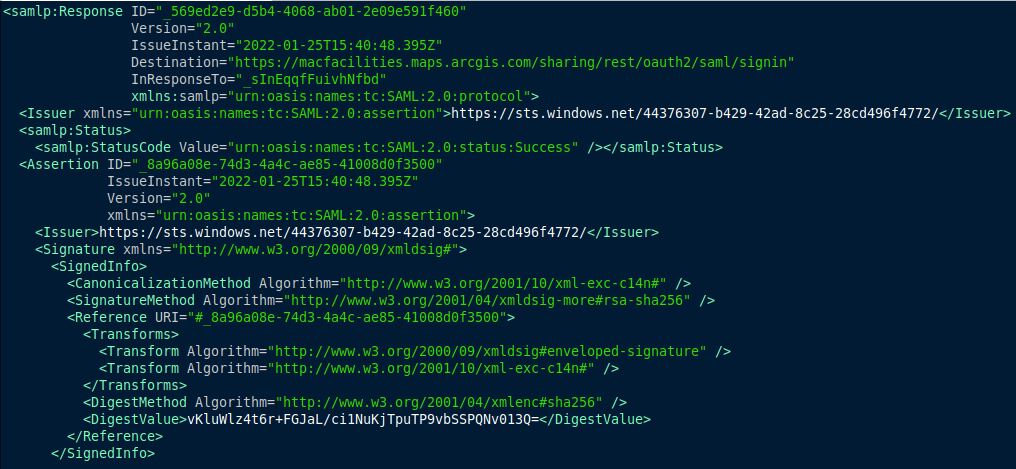
The Status element conveys the success or failure of sign-on. It includes the StatusCode element, which contains a code or a set of nested codes that represents the status of the request. It also includes the StatusMessage element, which contains custom error messages that are generated during the sign-on process.
For comparison, the following is a SAML response to an unsuccessful sign-on attempt:
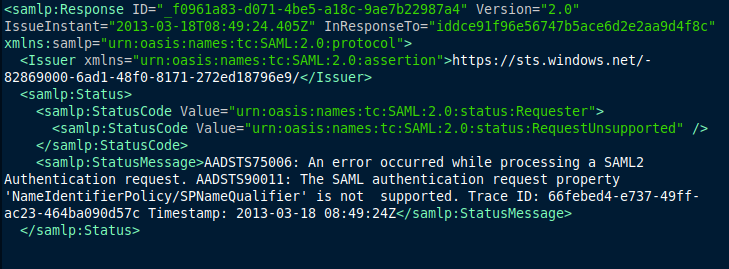
These responses are XML formatted and normally come embedded and parsed within a signed token response
Deploying SAML on the SP Side
In order for your application to be able to access SSO, it must locally rely on a layer of software that can issue SAML assertions to an IDP server. The following section describes the deployment of a generic Shibboleth based SP software. Note that the process is equally applicable to non-Shibboleth deployments and either of these types of SPs can connect to Azure AD IDP or the Shibboleth IDP. Basic familiarity and ability to read and edit XML files with a text editor is a requirement to understand this section. If Shibboleth is NOT the preferred method for SP deployment, click here for other types of SAML SP Clients.
Server Preparation and Installation
- Designate a system to be set up as your SP Shibboleth server. This server should be hosted in an appropriate environment that follows recommended practices around security and maintenance protocols.
- Open firewall ports, if needed. Ports 80 and 443 must be open to inbound traffic, and 8443 must be open for outbound traffic.
For Linux users, notice that currently supported distributions of Linux are listed on the Linux Install page of the Shibboleth Project site. Be aware of the Shibboleth warning regarding SELinux. The supported distributions of Linux can be installed from RPM via Yum. Installation instructions are also provided to build from SRPM or to build from Source, but doing so is not recommended. As McMaster Identity Providers are running at Version 3.x, it is recommended to choose the SP version within the 3.0.x family, the latest the better. The installation will build and install an apache module and the shibd daemon.
Verify the Installation
Before configuring your server, verify that Shibboleth has been properly installed on your server.
Confirm that Shibboleth functionality is present:
sudo shibd -t
Which should return a response that ends with:
overall configuration is loadable, check the console for non-fatal problems
Confirm Apache functionality:
sudo apache2ctl configtest
Which should return a response of:
Syntax OK
Confirm shibd functionality:
Restart the web server, then navigate to “https://my-sp-site.mcmaster.ca/Shibboleth.sso/Session”
This should return a page response of:
A valid session was not found.
This message means that Shibboleth has been loaded by the web server and is successfully communicating with the shibd process but there are no logging session present yet.
If you need more complete instructions visit the Shibboleth Wiki – Installation page
Configuring the shibboleth2.xml File
The shibboleth2.xml file will need to be configured for your Service Provider (SP). The file comes with the Shibboleth SP software, and is located by default in /etc/shibboleth and looks like this:
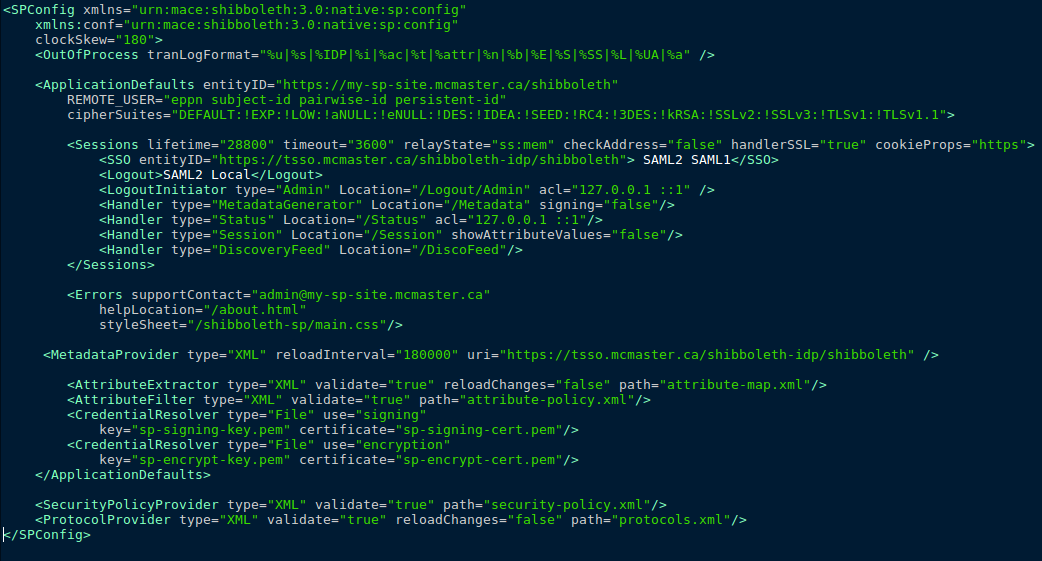
follow these instructions to make the appropriate changes to the file to configure it for your SP.
Note: Before making changes, save a copy of the original shibboleth2.xml file.
Update the entityID:
In the ApplicationDefaults element, the entityID value should be updated from entityID=”sp.example.org” to the host name, or a static identifier of your website. The entity ID does not need to resolve to a web page. Ensure that the DNS name used has been properly registered and linked in DNS.
In the SessionInitiator element within the ApplicationDefaults element, the entityID there should be updated to the McMaster specific entity ID for your case. The entity IDs for the staging and production environments should be different as they would be using different IdPs.
Update the support contact:
In the Errors element, update the supportContact value to a valid email address for the person managing the SP configuration. This email address is used by the IT Security Team to communicate any changes made to the SP owners.
Update the IdP metadata provider:
Update the MetadataProvider element (as there are 2) by changing the uri value to the McMaster IdP metadata. The metadata address is different for staging and production, so be sure to update it to the appropriate value. Until you have completed testing, use the staging SSO IDP value.
Save the shibboleth2.xml file.
Modify the Apache httpd.conf file
To enable Shibboleth on your website, make the following changes to the Apache httpd.conf file. On RedHat/Fedora type distros the configuration file is located by default at /etc/sysconfig/httpd.
Set the appropriate handler in Apache.
<Location /Shibboleth.sso>
SetHandler shib
</Location>
Protect the appropriate content on your site by enabling authentication via Shibboleth.
<Location /secure>
AuthType shibboleth
ShibtRequestSetting requireSession true
Require valid-user
</Location>
Install an X509 certificate
As Shibboleth requires a certificate and key to encrypt and decrypt attribute assertions, an X509 certificate must be installed for it to work. The Service Provider signing certificate (sp-cert.pem) and key (sp-key.pem) were generated in the installation process and do not need to be modified. They are located in the /conf/ directory.
Enable Logging
Two different sets of Shibboleth-related log files are included with the installation.
Shibd (shibd.log) logging is located in the /var/log/shibboleth directory and can be configured in the /etc/shibboleth/shibd.logger directory.
apache module (native.log) logging is located in the /var/log/httpd directory and can be configured in the /etc/shibboleth/native.logger directory.
Modify The attribute-map.xml file (optional)
Your SP’s attribute-map.xml file decodes the attributes released by the Identity Provider. Note that the default Shibboleth SP attribute-map.xml configuration file might not recognize some of the McMaster specific extended attributes unless the file is modified.
Refer to Shibboleth Attributes/Claims section for specifics on attributes available or see below for relevant excerpts from the file.
The ePPN attribute is this section:
<Attribute name=”urn:mace:dir:attribute-def:eduPersonPrincipalName” id=”eppn”>
<AttributeDecoder xsi:type=”ScopedAttributeDecoder”/>
</Attribute>
<Attribute name=”urn:oid:1.3.6.1.4.1.5923.1.1.1.6? id=”eppn”>
<AttributeDecoder xsi:type=”ScopedAttributeDecoder”/>
</Attribute>
The affiliation attribute is this section:
<Attribute name=”urn:mace:dir:attribute-def:eduPersonScopedAffiliation” id=”affiliation”>
<AttributeDecoder xsi:type=”ScopedAttributeDecoder” caseSensitive=”false”/>
</Attribute>
<Attribute name=”urn:oid:1.3.6.1.4.1.5923.1.1.1.9? id=”affiliation”>
<AttributeDecoder xsi:type=”ScopedAttributeDecoder” caseSensitive=”false”/>
</Attribute>
The unscoped affiliation attribute is this section:
<Attribute name=”urn:mace:dir:attribute-def:eduPersonAffiliation” id=”unscoped-affiliation”>
<AttributeDecoder xsi:type=”StringAttributeDecoder” caseSensitive=”false”/>
</Attribute>
<Attribute name=”urn:oid:1.3.6.1.4.1.5923.1.1.1.1? id=”unscoped-affiliation”>
<AttributeDecoder xsi:type=”StringAttributeDecoder” caseSensitive=”false”/>
</Attribute>
The McMaster specific attributes are shown in this section to map the MacID and the email of the person (just samples):
<Attribute name=”urn:mace:dir:attribute-def:uid” id=”uid”/>
<Attribute name=”urn:oid:0.9.2342.19200300.100.1.1? id=”uid”/>
<Attribute name=”urn:oid:0.9.2342.19200300.100.1.3? id=”mail”/>
Register the SP with the IDP (Applies to Azure AD and Shibboleth)
Before registering your SP, you must generate your SP metadata:
Restart shibd:
sudo service shibd stop
sudo service shibd start
Download your metadata from the server:
curl -o sample-app-partner-metadata.xml -k ‘https://my-sp-site.mcmaster.ca/Shibboleth.sso/Metadata’
Where my-sp-site.mcmaster.ca is the entityID of your SP configuration.
Note: The “-o” parameter specifies the appropriate filename, and -k ignores any SSL errors.
Contact UTS to Submit your Metadata Information
Once you have your SP metadata, submit the file to complete your application registration. Someone will contact you when the process is completed and you can begin testing.
Important! If you make changes post metadata submission, you will need to provide the updated metadata to be re-loaded into either test or production.
Test SP Integration With The IdP Server
After you have been confirmed that your metadata is active, you can test your SP to ensure it is properly integrated with the IdP server (Azure AD or Shibboleth). Confirm that you are able to log in with your account or a test account, and that attributes are properly released.
Use the following techniques to test access to the “/secure” portion of your application or whatever protected location you have set to use the SAML access:
Using a web browser, visit the /secure directory (or other protected location) of your SP. You should be prompted to log in, and after logging in, you should see the attributes associated with the account that you used to log in to the secure directory. If you are prompted to log in, your SP is properly integrated with the IDP. If attributes are being properly released to your SP and the attribute-map.xml file is properly configured you should see these attributes are displayed in the IDP response.
Moving to Production
After your SP passes testing, update your shibboleth2.xml file with production IDP values in place of staging values. Also, make sure you update your entityID in the SessionInitiator element, and the metadata source in the MetadataProvider element.
Contact UTS to schedule the loading up of your production metadata file and coordination of the move of your application to production.
Deploying and Configuring OIDC/Oauth2
There are two general approaches to building web applications today: traditional web applications that perform most of the application logic on the server, and single-page applications (SPAs) that perform most of the user interface logic in a web browser, communicating with the web server primarily using web APIs. A hybrid approach is also possible, the simplest being host one or more rich SPA-like sub-applications within a larger traditional web application.
Use traditional web applications when:
- Your application’s client-side requirements are simple or even read-only.
- Your application needs to function in browsers without JavaScript support.
Use a SPA when:
- Your application must expose a rich user interface with many features.
- Your team is familiar with JavaScript, TypeScript, ASP.net or any other scripting environment that contains Azure SSO friendly libraries for development.
- Your application must already expose an API for other (internal or public) clients.
Additionally, SPA frameworks require greater architectural and security expertise. They experience greater churn due to frequent updates and new client frameworks than traditional web applications. Configuring automated build and deployment processes and utilizing deployment options like containers may be more difficult with SPA applications than traditional web apps.
Web App Sign-in Flow
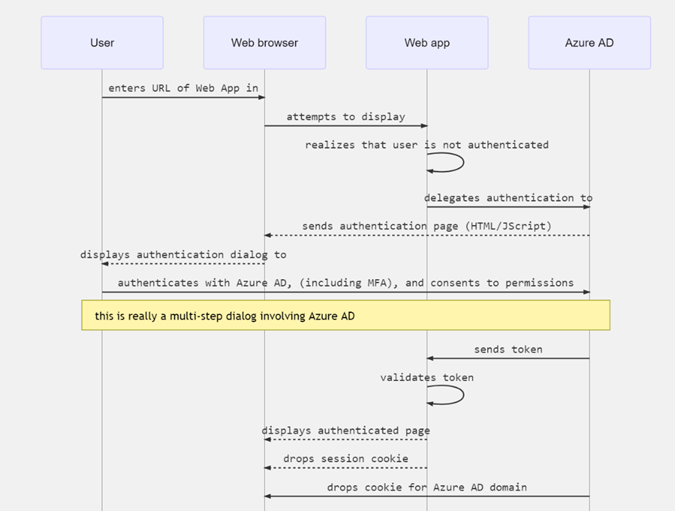
When a user navigates in the browser to a web app, the following happens:
The web app determines whether the user is authenticated. If the user isn’t authenticated, the web app delegates to Azure AD to sign in the user. That sign in will be compliant with the policy of the organization, which may mean asking the user to enter their credentials and use multi-factor authentication (sometimes referred to as two-factor authentication or 2FA).
The user is then (depending on the set up) asked to consent to the access that the client app needs. This is why client apps need to be registered with Azure AD, so that the Microsoft identity platform can deliver tokens representing the access that the user has consented to. When the user has successfully authenticated, Microsoft identity platform sends a token to the web app. A cookie containing the identity of the user associated with Azure AD’s domain is saved in the browser’s cookie jar. The next time an app uses the browser to navigate to the Microsoft identity platform authorization endpoint, the browser presents the cookie so that the user doesn’t have to sign in again. This is also the way that SSO is achieved. The cookie is produced by Azure AD and can only be understood by Azure AD.
The web app then validates the token. If the validation succeeds, the web app displays the protected page and saves a session cookie in the browser’s cookie jar. When the user navigates to another page that also requires the same type of session, the web app will know that the user is authenticated based on the session cookie.
The following sequence diagram summarizes this interaction:
Single-Page Applications (SPA)
Most modern web apps are built as client-side single-page applications. These applications might use plain JavaScript or a JS framework like Angular, Vue, React or Node and all these run in a web browser. Single-page applications differ from traditional server-side web apps in terms of authentication characteristics. By using the Microsoft identity platform, single-page applications can sign in users and get tokens to access back-end services or web APIs.
How Authorization Flows Work
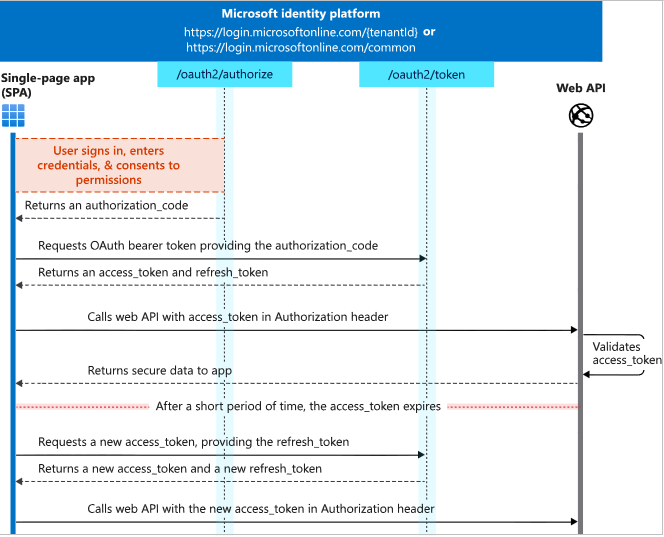
The flow diagram below demonstrates the OAuth 2.0 authorization code grant (with details around PKCE omitted), where the app receives a code from the Microsoft identity platform authorize endpoint, and redeems it for an access token and a refresh token using cross-site web requests. The access token expires every 24 hours, and the app must request another code using the refresh token. In addition to the access token, an id_token that represents the signed-in user to the client application is typically also requested through the same flow and/or a separate OpenID Connect request (not shown here)
Configuring an SPA App to Authenticate Via Azure
- Step 1
- Determine the type of sign-in flow your app will be using (implicit or authorization code); this will determine the way the application registration is set up on the Azure side.
- Step 2
- Have UTS register your application using the proposed flow from step 1. To register your app, a redirect URL will be required. If your app is in development, you might have to use a custom configuration such as http://localhost:<port>/ where<port> is the custom TCP port number. This will be used by Azure to respond back to your application. The location has to be “web discoverable”. This means that your page must be hosted by a web server of some sort depending on your scripting environment and which can produce a well formed “return URL”.
- Step 3
- Configure your application project. Your code should be configured to work as shown (example is for a JS based app):
-
- If your application is designed to call a web API, we recommend that you call the acquireTokenSilent method to acquire or renew an access token before you call a web API. After you have a token, you can call a protected web API. Use the acquired access token as a bearer in an HTTP request to call any web API, such as Microsoft Graph API.
- Coding examples: PHP and JS
- Step 4
- Setup the UI for your SPA app. Before you can get tokens to access APIs in your application, you need an authenticated user context. You can sign in users to your application via the MSAL.js library from Microsoft or any other scripting library that supports Azure SSO for development.
- You application can use either:
- Pop-up window, by using the loginPopup method (JS)
- Redirect, by using the loginRedirect method (JS)
- The choice between a pop-up or redirect experience depends on your application flow:
- If you don’t want users to move away from your main application page during authentication, we recommend the pop-up method. Because the authentication redirect happens in a pop-up window, the state of the main application is preserved.
- If users have browser constraints or policies where pop-up windows are disabled, you can use the redirect method.
- Sign-in
- Sign-out
- The MSAL library or any other scripting library of your choice should provide a logout method that clears the cache in browser storage and send a sign-out request to Azure Active Directory (Azure AD). After sign-out, the library can redirect back to the application start page by default.
- Use either of these Microsoft resources for samples of how to accomplish these:
- Sign-out
- Step 5
- test your application. Once you have completed the creation of the application, you are now ready to test the app’s functionality. In your browser, navigate to your local host’s web server and locate the index.html file and/or the Sign In button. If things are properly connected, you should get a prompt to sign in with the Microsoft identity platform. Sign-in using a test account and consent to requested permissions if applicable. If your application is working correctly, you should pass the login test and be transferred to the restricted area of your site and/or obtain extra data via the API call (depends on your design and the scope granted to your app).
- Step 6
- Move your app to production. Once your app can sign-in users and acquire a token to call web APIs, it is time to move to production. Enable logging to make your app is production ready and follow the Microsoft identity platform integration checklist:
- Make sure your application requests the least privilege permissions. Only ask for permissions that your application absolutely needs, and only when you need them.
- Maintain ownership of all your redirect URIs and keep the DNS records for them up-to-date.
- Ensure all URIs are secure and encrypted (i.e. using https schemes).
- Ensure that your app adheres to the terms of your organization in terms of protecting user’s identity and data and the platform.
- Make sure the information associated with the app registration and management is up-to-date.
- Adhere to your organization’s branding guidelines for applications.
- Use a meaningful name and logo for your application and make sure these are representative of your organization so that users trust using it.
- Ensure you app is not violating any trademarks.
- Provide links to your app’s terms of service and privacy statement.
- Move your app to production. Once your app can sign-in users and acquire a token to call web APIs, it is time to move to production. Enable logging to make your app is production ready and follow the Microsoft identity platform integration checklist:
Shibboleth SSO Integration Via SAML
McMaster University hosts a non-cloud (on-premises) authentication service for SSO based on Shibboleth technology. The shibboleth IDP server only supports SAML and it remains a valid option when applications cannot support Azure AD integrations for specific reasons such as the need to obtain additional authorization metadata depending on the requirements of the application. For example, some applications may need to obtain the value of a specific user affiliation or the user’s academic information. During the integration process, applications must indicate as precisely as possible which attributes would be required for authorization purposes.
McMaster University is a member of 2 education federations through the Shibboleth authentication service:
- InCommon Federation which manages federated authentication services between higher education institutions and their sponsored partners throughout North America. As a member, McMaster faculty, staff, and students are able to access resources using their local MacID account. All participants in this federation use a common set of policies and practices to exchange information about their users and resources in order to share access and enable collaboration between participants. The underlying technology used to support federated authentication between participants in the InCommon Federation is the Shibboleth System.
- Canadian Access Federation (CAF) is another mayor federation McMaster University belongs to via membership to CANARIE. Participation in CAF enhances the user experience of researchers, students and faculty by allowing a MacID account to seamlessly access trusted content, services, and applications any time, from any place. Membership to CANARIE also includes access to EDUROAM, which allows for seamless Wi-Fi access through eduroam at over 17,000 locations in 100 countries worldwide.
How To Register Your Application With The Shibboleth IDP
To register a SAML based application with the Shibboleth IDP (Test or Prod), owners must provide the Metadata URI (or an XML file containing the metadata details) and the Redirect URI of the application. The metadata should also contain the signing public key and the logout URI. When the application gets registered, owners will be given the details of the registration and the specific Shibboleth IDP information for the application.
McMaster University hosts two Shibboleth IDP servers as follows:
Production
EntityID: https://sso.mcmaster.ca/
Metadata: https://sso.mcmaster.ca/shibboleth-idp/shibboleth
SSL certificate: idp.crt
Test/Development
EntityID: https://tsso.mcmaster.ca/
Metadata: https://tsso.mcmaster.ca/shibboleth-idp/shibboleth
SSL certificate: idp-t.crt
Identity Provider Information for InCommon Service Providers:
InCommon SPs must use urn:mace:incommon:mcmaster.ca for McMaster University’s IdP entityID.
All other InCommon metadata should be downloaded directly from InCommon.
Deploying The Service Provider (SP)
In order to connect to the Shiboleth IDP server, an application must rely on a Service Provider layer of software that can handle SAML. The SP software consists of several components:
ISAPI Filter – This is only used for IIS deployments. It intercepts requests to IIS and redirects users to an IdP or WAYF. After the user authenticates it also handles the callback which tells your SP that the user has authenticated. During handling of this callback the ISAPI Filter collects attributes which describe the authenticated user. The filter is configured through the shibboleth2.xml config file.
Apache Module – This is only used for Apache deployments. It is essentially the same as the ISAPI Filter but for the Apache web server. In addition to shibboleth2.xml, some configuration is required via httpd.conf.
Shibd – This is a service or daemon ((Windows and Linux) that handles queries from the SP to the IdP. Shibboleth requests are part of the SAML standard and are made via a back channel SOAP call to the IdP (usually on port 8443). In order for these queries to work, this service must be running.
Attribute Acceptance Policy (AAP) – This policy dictates which attributes the SP wants and which IdPs are authorized to provide them. It may also define specific formats that the values must match. In addition, the AAP determines what HTTP headers will be used for mapping attributes that are supplied by the IdP. There are two files that work together to enable this functionality: the attribute-map.xml and attribute-policy.xml.
For an in-depth explanation of how to deploy and configure your SP refer Understanding and Configuring SAML -> Deploying SAML On The SP Side.
Enabling Shibboleth Logout
If a partner application connected to Shibboleth wants to destroy the login session, a call to the following URL should suffice:
https://sso.mcmaster.ca/idp/profile/SAML2/Redirect/SLO
The above action will ensure that the Shibboleth session in the user’s browser is closed so long as the logout action is successful and the SP is configured correctly. The logout process accomplishes this by removing the Shibboleth session cookie in the browser and then redirects the traffic to the logout URL specified in the above call. Other application sessions might be affected by this but it does not guarantee a global SSO logout.
Shibboleth Attributes/Claims
In some cases SAML based applications do require extra information about the user during the login process. To assist with this, a set of default and extended set of attributes is available for release to qualified Service Providers.
Default Attribute Set
| Oasis Claim Name | EduPerson Name | Possible # Records | Notes |
| urn:oid:0.9.2342.19200300.100.1.1 | “uid” | one record only | This is the person’s Mac ID | jdoe |
| urn:oid:2.5.4.42 | “givenName” | one record only | given name as specified in the Mosaic user record | first name, ex: john |
| urn:oid:2.5.4.4 | “sn” | one record only | surname as specified in the Mosaic user record | surname/last name, ex: doe |
Extended Attribute Set
These claims can be can be selectively released depending on what is required for the authorization component of the integration.
| Oasis Claim Name | EduPerson Name | Possible # Records | Notes |
| urn:oid:2.16.840.1.113730.3.1.241 Understanding and Configuring Oauth2/OIDC | “displayName” | one record only | The displayName attribute from on-premises AD | Prof. John Doe |
| urn:oid:0.9.2342.19200300.100.1.3 | “mail” | one record only | Contact email address as specified in the Mosaic user record | john_doe@mcmaster.ca |
| urn:oid:2.5.4.3 | “cn” | one record only | Just a concatenation of “GivenName” and “sn” |
| urn:oid:2.16.840.1.113730.3.1.3 | “employeeNumber” | one record only | employee number as specified in the Mosaic user record | 999999999 |
| urn:oid:13.6.1.4.1.5923.1.1.1.6 | “eduPersonPrincipalName” | one record only | Authenticated principals receive the value “MacID@mcmaster.ca”. MacID is the value of “cn” (common name) in AD | jdoe@mcmaster.ca |
| urn:oid:1.3.6.1.4.1.5923.1.1.1.9 | “eduPersonScopedAffiliation” | one record only | affiliation@mcmaster.ca |
| urn:oid:1.3.6.1.4.1.22306.1.1.29 | “job” | more than one record could be present | Authenticated principals that are employees receive some details of their employee record (see a sample here) |
| urn:oid:1.3.6.1.4.1.5923.1.1.1.1 | “eduPersonAffiliation” | more than one record could be present | Authenticated principals receive the value “affiliate”. Principals that have the “job” attribute receive also the value “staff”. Principals that have the “course” attribute and whose term is current, receive the value “student” | some principals could have more than one status |
| urn:oid:1.3.6.1.4.1.22306.1.1.32 | “career” | more than one record could be present | Authenticated principals receive details of their academic roll such as enrolment year, full/part time, residence status | multiple academic rolls could be presented |
| urn:oid:1.3.6.1.4.1.22306.1.1.30 | “program” | more than one record could be present | Authenticated principals receive details of their academic term, enrolled program, program description, term, level, academic group | multiple academic rolls could be presented |
Notes:
InCommon and CAF SPs are given the default attribute set but not the extended set.
Application owners can request the release of the above attributes to their SPs via a UTS request. If you need any specific attributes, please file a data owner approval request clearly stating your entityID and the desired attributes.
The default attribute set automatically applies to new SPs during the SAML integration, unless they specify a need for extended attributes.
Test Login Accounts
To assist application owners during tests, non-person login accounts are available. Each test account represents a typical campus affiliation (or combination of).
shibtst1 – Alumni and CCE Student and Employee active/permanent – contains degree conferred,program records and job records.
shibtst2 – Alumni and CCE Student – contains program records and degree conferred
shibtst3 – Staff active/permanent – contains multiple job records.
shibtst4 – Student Registered/not enrolled – no program records
shibtst5 – Contracted employee (contains employeeclassdescription)
shibtst6 – POI Academic/faculty (contains employeeclass/classdescription)
shibtst7 – Retired (faculty) – No job records present
shibtst8 – Alumni – contains degreeConferred
shibtst9 – discontinued student – program/courses records exist
shbtst10 – regular undergrad student (social sciences/psychology)
shbtst11 – medical student (health sciences)
Legacy Methods No Longer Supported (McAuth/LDAP)
McMaster University has started using SAML (Azure) and Oauth2/OIDC for web authentication in order to leverage modern security features such as multi-factor authentication or MFA. However, the legacy methods known as McAuth and LDAP are still maintained for authentication at the organization. A project to phase out these old methods is underway and the expected outcome is to fully replace these by modern authentication methods . Owners of applications that continue using the legacy methods should begin preparations to move to one of the available modern methods in the near future. For campus servers and applications, migrating to a modern authentication method will involve the adoption of a specific applicable method to suit the needs and environment of the application and in some cases, some programmatic effort. If you manage IT resources related to authentication, you will be able to find information and links to technical documentation on this FAQ page.
McAuth
McAuth is a symmetric, in-house developed system originally conceived to provide simple authentication and authorization via PHP or Java. No new integrations using this method are encouraged nor allowed. Applications or websites that use McAuth for authentication/authorization should start making preparations to move to one of the modern authentication methods available. Please read through this FAQ for information on conducting this migration.
LDAP
Authentication via LDAP to the Active Directory environment is still possible but application or device owners should strongly consider moving to modern authentication to reduce risk and be able to use the more advanced protection features available. Public facing applications, devices or hosts are prime candidates to make the recommended switch. For more information about this, please read through this FAQ or contact the IT security team at “c-it-security@mcmaster.ca”.
Which websites and applications need to move to Modern Authentication?
University Technology Services will start contacting application owners around February 2022. If you administer a site that uses either McAuth or LDAP, you do not need to take any steps until UTS contacts you for planning.
How can I tell whether my website or application uses McAuth or LDAP?
Open a private browser window, then open your website or application in that window. Click on the link that allows for MacID login. A URL redirection to the authentication server should occur and the login screen should appear. Your site uses McAuth if the URL “https://cap.mcmaster.ca/mcauth/” appears in the browser’s address bar during authentication. For applications using LDAP, The browser will not display the address of the server allowing the authentication. This setting is hidden in the code and confirmation with a developer, application owner or device owner should provide confirmation on the method used.
How do I switch from legacy to modern authentication on my website or application?
All the authentication related web pages/scripts have to be disconnected from the old method and the integration components have to be removed or disabled. For information and instructions on how to adopt any of the modern authentication methods, see the resources here.
What happens if I am unable to migrate my website or application to modern authentication?
Unless you request a deadline extension, your website or application will be required to migrate within a reasonable amount of time. This applies primarily to applications using the legacy methods based on either McAuth or LDAP. For instructions on how to request an extension, see “What should I do if I can’t move my website or application to modern auth?” below.
How can I get help with the migration to modern authentication?
Review the resources for adoption of modern authentication here, join the Legacy Auth Migration Project, or submit a help request to get help from the IT Security team.
Are there any specific action items for McAuth migration?
- 1 Notify the IT-Security team of your intention to proceed with a migration of your application.
- Take inventory of the application(s) in your environment currently using McAuth
- Obtain the following information for each application: application name, URL, business/application owner, technical contact.
- Provide a list of the attributes/claims used by the application.
- Ask to be included in the Legacy Auth Migration Project.
What should I do if I can not move my website or application to modern authentication?
First, decide whether your website or application needs to continue using authentication. If it does not, then take steps to remove/disconnect from either McAuth or LDAP. If your website or application does need to continue using authentication but you cannot migrate to modern authentication due to unforeseen reasons, deadline extensions are available on a case-by-case basis. During the extension time you will be required to look for alternatives in your application that allow for compatibility to one of the available modern methods. Submit a help request to discuss an extension with the IT-Security team. In the request, include the following information:
- Application owner contact information
- local technical support contact information
- URL of your website or application
- Extension date that you want
