SAML is an acronym used to describe the Security Assertion Markup Language (SAML). Its primary role in online security is that it enables users to access multiple web applications using a set of login credentials. It works by passing authentication information in a particular format between two parties, usually an identity provider and a web application. SAML is also an open standard based upon the Extensible Markup Language (XML) format. Web applications use SAML to transfer authentication data between two parties – the identity provider (IDP) and the service provider (SP). SAML works by exchanging user information, such as logins, authentication state, identifiers, and other relevant attributes between the identity and service provider. SSO (Single Sign-On) is achieved when users can log on to multiple web applications after having logged only once into the identity provider thus providing a faster, seamless user experience.
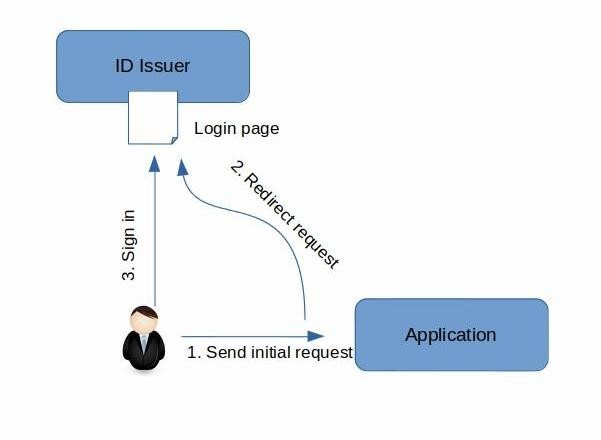
The process can be best understood as a communication flow between a client browser and a web based application. The flow relies on browser redirects and HTTP GET and POST to request and pass around tokens. The process starts with the user triggering a login request to access a restricted resource that requires authentication. The login link is usually hosted by the SP server within the partner application. When a login request is received by the SP, a SAML request is sent via an HTTP request to the IDP server (Azure AD or Shibboleth).
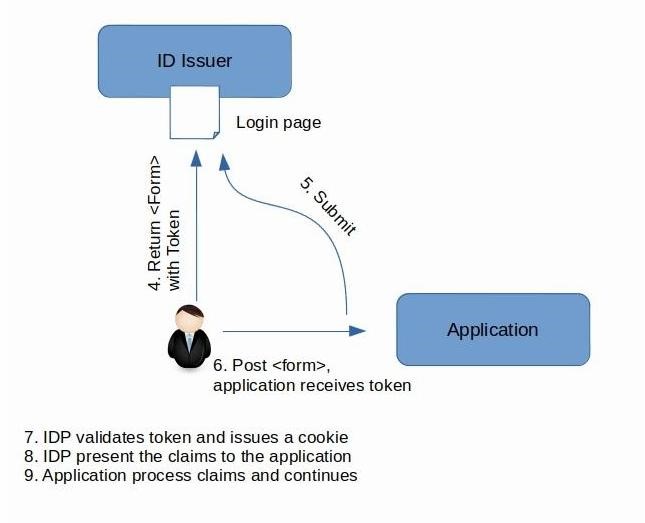
The IDP replies back with a login screen asking the user to authenticate. If the user passes the test and the IDP has authenticated the user, it gathers whatever claims the application needs, packages them into a security token, and signs the token with its private key. If the application wants its tokens encrypted, the IDP encrypts the token with the public key in the application’s certificate. The IDP then uses the Assertion Consumer Service URL registered by the SP to submit the token back to the browser and the SP. The ACS contains the return URL that the SP expects the traffic to be sent to if the login test has been passed. The SP then decodes the response message and if receives a ‘success’ result, it routes the user to the restricted area represented but the ACS URI.
If the login fail tests, the IDP displays a message to the user indicating that there has been a problem and the user must verify the credential details before attempting again. Keep in mind that web applications and SOAP Web services each use slightly different techniques, but you should recognize that the overall shapes of the handshakes are very similar because the goal is always the same: to communicate claims from the IDP to the application in a secure fashion.
The communication flow can be better represented by a sequence of steps:
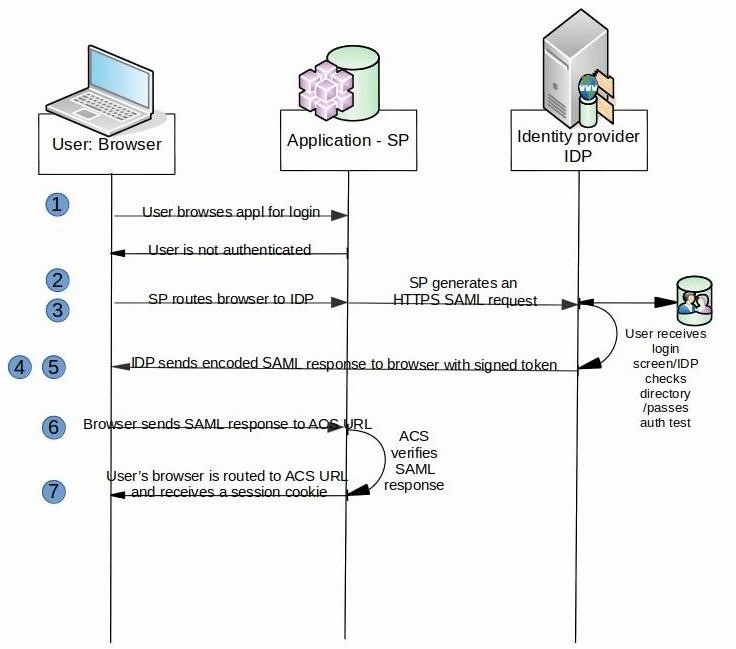
Keep in mind that the authentication process is not repeated unless the user signs off or destroys the session cookie or the session expires. When the user comes back and if a session cookie is present, the SP can intercept the session cookie and use it to reconstruct the session security token by decoding, decrypting and decompressing the cookie. Next, it checks the session security token expiration date, creates the ClaimsPrincipal object with the claims inside and sets the HttpContext.User property to the ClaimsPrincipal object. Security wise, all of the steps both for the initial and subsequent requests, should run over the Secure Sockets Layer (SSL) to ensure that an eavesdropper can’t steal either the token or the logon session cookie and replay them to the application in order to impersonate a legitimate user.
IDP Response
The IDP will always respond with an encoded XML message to indicate the result of the login interaction. The following illustrates a typical ‘successful’ login response from the IDP:
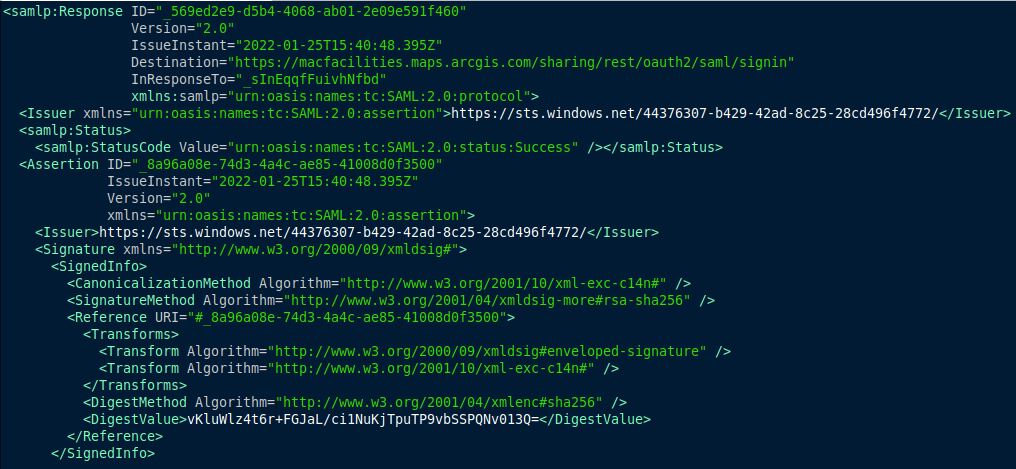
The Status element conveys the success or failure of sign-on. It includes the StatusCode element, which contains a code or a set of nested codes that represents the status of the request. It also includes the StatusMessage element, which contains custom error messages that are generated during the sign-on process.
For comparison, the following is a SAML response to an unsuccessful sign-on attempt:
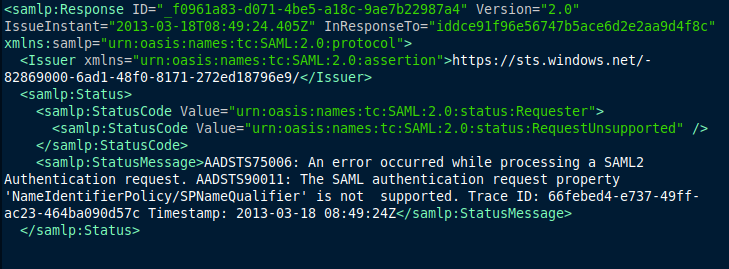
These responses are XML formatted and normally come embedded and parsed within a signed token response
Deploying SAML on the SP Side
In order for your application to be able to access SSO, it must locally rely on a layer of software that can issue SAML assertions to an IDP server. The following section describes the deployment of a generic Shibboleth based SP software. Note that the process is equally applicable to non-Shibboleth deployments and either of these types of SPs can connect to Azure AD IDP or the Shibboleth IDP. Basic familiarity and ability to read and edit XML files with a text editor is a requirement to understand this section. If Shibboleth is NOT the preferred method for SP deployment, click here for other types of SAML SP Clients.
Server Preparation and Installation
- Designate a system to be set up as your SP Shibboleth server. This server should be hosted in an appropriate environment that follows recommended practices around security and maintenance protocols.
- Open firewall ports, if needed. Ports 80 and 443 must be open to inbound traffic, and 8443 must be open for outbound traffic.
For Linux users, notice that currently supported distributions of Linux are listed on the Linux Install page of the Shibboleth Project site. Be aware of the Shibboleth warning regarding SELinux. The supported distributions of Linux can be installed from RPM via Yum. Installation instructions are also provided to build from SRPM or to build from Source, but doing so is not recommended. As McMaster Identity Providers are running at Version 3.x, it is recommended to choose the SP version within the 3.0.x family, the latest the better. The installation will build and install an apache module and the shibd daemon.
Verify the Installation
Before configuring your server, verify that Shibboleth has been properly installed on your server.
Confirm that Shibboleth functionality is present:
sudo shibd -t
Which should return a response that ends with:
overall configuration is loadable, check the console for non-fatal problems
Confirm Apache functionality:
sudo apache2ctl configtest
Which should return a response of:
Syntax OK
Confirm shibd functionality:
Restart the web server, then navigate to “https://my-sp-site.mcmaster.ca/Shibboleth.sso/Session”
This should return a page response of:
A valid session was not found.
This message means that Shibboleth has been loaded by the web server and is successfully communicating with the shibd process but there are no logging session present yet.
If you need more complete instructions visit the Shibboleth Wiki – Installation page
Configuring the shibboleth2.xml File
The shibboleth2.xml file will need to be configured for your Service Provider (SP). The file comes with the Shibboleth SP software, and is located by default in /etc/shibboleth and looks like this:
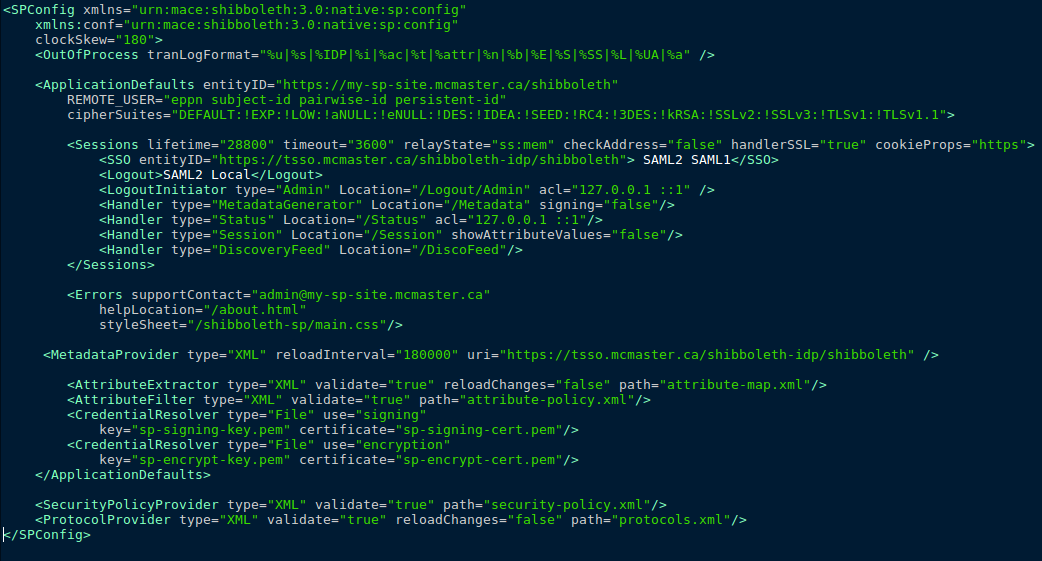
follow these instructions to make the appropriate changes to the file to configure it for your SP.
Note: Before making changes, save a copy of the original shibboleth2.xml file.
Update the entityID:
In the ApplicationDefaults element, the entityID value should be updated from entityID=”sp.example.org” to the host name, or a static identifier of your website. The entity ID does not need to resolve to a web page. Ensure that the DNS name used has been properly registered and linked in DNS.
In the SessionInitiator element within the ApplicationDefaults element, the entityID there should be updated to the McMaster specific entity ID for your case. The entity IDs for the staging and production environments should be different as they would be using different IdPs.
Update the support contact:
In the Errors element, update the supportContact value to a valid email address for the person managing the SP configuration. This email address is used by the IT Security Team to communicate any changes made to the SP owners.
Update the IdP metadata provider:
Update the MetadataProvider element (as there are 2) by changing the uri value to the McMaster IdP metadata. The metadata address is different for staging and production, so be sure to update it to the appropriate value. Until you have completed testing, use the staging SSO IDP value.
Save the shibboleth2.xml file.
Modify the Apache httpd.conf file
To enable Shibboleth on your website, make the following changes to the Apache httpd.conf file. On RedHat/Fedora type distros the configuration file is located by default at /etc/sysconfig/httpd.
Set the appropriate handler in Apache.
<Location /Shibboleth.sso>
SetHandler shib
</Location>
Protect the appropriate content on your site by enabling authentication via Shibboleth.
<Location /secure>
AuthType shibboleth
ShibtRequestSetting requireSession true
Require valid-user
</Location>
Install an X509 certificate
As Shibboleth requires a certificate and key to encrypt and decrypt attribute assertions, an X509 certificate must be installed for it to work. The Service Provider signing certificate (sp-cert.pem) and key (sp-key.pem) were generated in the installation process and do not need to be modified. They are located in the /conf/ directory.
Enable Logging
Two different sets of Shibboleth-related log files are included with the installation.
Shibd (shibd.log) logging is located in the /var/log/shibboleth directory and can be configured in the /etc/shibboleth/shibd.logger directory.
apache module (native.log) logging is located in the /var/log/httpd directory and can be configured in the /etc/shibboleth/native.logger directory.
Modify The attribute-map.xml file (optional)
Your SP’s attribute-map.xml file decodes the attributes released by the Identity Provider. Note that the default Shibboleth SP attribute-map.xml configuration file might not recognize some of the McMaster specific extended attributes unless the file is modified.
Refer to Shibboleth Attributes/Claims section for specifics on attributes available or see below for relevant excerpts from the file.
The ePPN attribute is this section:
<Attribute name=”urn:mace:dir:attribute-def:eduPersonPrincipalName” id=”eppn”>
<AttributeDecoder xsi:type=”ScopedAttributeDecoder”/>
</Attribute>
<Attribute name=”urn:oid:1.3.6.1.4.1.5923.1.1.1.6? id=”eppn”>
<AttributeDecoder xsi:type=”ScopedAttributeDecoder”/>
</Attribute>
The affiliation attribute is this section:
<Attribute name=”urn:mace:dir:attribute-def:eduPersonScopedAffiliation” id=”affiliation”>
<AttributeDecoder xsi:type=”ScopedAttributeDecoder” caseSensitive=”false”/>
</Attribute>
<Attribute name=”urn:oid:1.3.6.1.4.1.5923.1.1.1.9? id=”affiliation”>
<AttributeDecoder xsi:type=”ScopedAttributeDecoder” caseSensitive=”false”/>
</Attribute>
The unscoped affiliation attribute is this section:
<Attribute name=”urn:mace:dir:attribute-def:eduPersonAffiliation” id=”unscoped-affiliation”>
<AttributeDecoder xsi:type=”StringAttributeDecoder” caseSensitive=”false”/>
</Attribute>
<Attribute name=”urn:oid:1.3.6.1.4.1.5923.1.1.1.1? id=”unscoped-affiliation”>
<AttributeDecoder xsi:type=”StringAttributeDecoder” caseSensitive=”false”/>
</Attribute>
The McMaster specific attributes are shown in this section to map the MacID and the email of the person (just samples):
<Attribute name=”urn:mace:dir:attribute-def:uid” id=”uid”/>
<Attribute name=”urn:oid:0.9.2342.19200300.100.1.1? id=”uid”/>
<Attribute name=”urn:oid:0.9.2342.19200300.100.1.3? id=”mail”/>
Register the SP with the IDP (Applies to Azure AD and Shibboleth)
Before registering your SP, you must generate your SP metadata:
Restart shibd:
sudo service shibd stop
sudo service shibd start
Download your metadata from the server:
curl -o sample-app-partner-metadata.xml -k ‘https://my-sp-site.mcmaster.ca/Shibboleth.sso/Metadata’
Where my-sp-site.mcmaster.ca is the entityID of your SP configuration.
Note: The “-o” parameter specifies the appropriate filename, and -k ignores any SSL errors.
Contact UTS to Submit your Metadata Information
Once you have your SP metadata, submit the file to complete your application registration. Someone will contact you when the process is completed and you can begin testing.
Important! If you make changes post metadata submission, you will need to provide the updated metadata to be re-loaded into either test or production.
Test SP Integration With The IdP Server
After you have been confirmed that your metadata is active, you can test your SP to ensure it is properly integrated with the IdP server (Azure AD or Shibboleth). Confirm that you are able to log in with your account or a test account, and that attributes are properly released.
Use the following techniques to test access to the “/secure” portion of your application or whatever protected location you have set to use the SAML access:
Using a web browser, visit the /secure directory (or other protected location) of your SP. You should be prompted to log in, and after logging in, you should see the attributes associated with the account that you used to log in to the secure directory. If you are prompted to log in, your SP is properly integrated with the IDP. If attributes are being properly released to your SP and the attribute-map.xml file is properly configured you should see these attributes are displayed in the IDP response.
Moving to Production
After your SP passes testing, update your shibboleth2.xml file with production IDP values in place of staging values. Also, make sure you update your entityID in the SessionInitiator element, and the metadata source in the MetadataProvider element.
Contact UTS to schedule the loading up of your production metadata file and coordination of the move of your application to production.